How to clean Data using Import Workspace
If you have a spreadsheet full of contact information, like names and addresses, you can use Sumac to validate the information before importing. Sumac does not allow you to import incorrect information, so you must clean up and validate the data before importing it into Sumac.
Start by saving the spreadsheet as a tab-delimited file .txt file. In Sumac, click Utilities, Import, and then Import Workspace.
Choose the file you need to validate and click OK.
Start by specifying the number of header rows in your spreadsheet. In our example, the spreadsheet uses only 1 row for the header. Notice that Sumac has greyed out the information in the first row to indicate that it is the header.
Notice that the first name and last name for these contacts are all in the same column. Since those are 2 separate fields in Sumac, you need to split them apart. Start by selecting the Name column, then click “Split Column.”
Enter the character that separates the data in this column. In this spreadsheet, the first and last names are separated by a comma, so enter a comma. Since there is only one comma splitting information in this column, choose “Split on the first occurrence.” Click OK.

If your data was split by two commas, for example a name appeared as First, Middle, Last then you might opt to select last occurrence. That would result in First, Middle appearing in one column and Last appearing in another.
Sumac splits the column so the first and last name are separated.
You can rename the headers to Last Name and First Name, respectively:
Since Last name is the only mandatory field in a contact record, each contact you import must have a last name. To make sure that they all have a last name, select the Last Name column and click Sort.
Sumac sorts all contacts without a last name to the top of this spreadsheet. If there is no other information about these contacts in the spreadsheet, delete these rows. If there is other information, like an email address for example, enter a last name like “[Unknown]” for these contacts, so you can still add their email addresses to your database for mailings.
To quickly fill in [Unknown] for several contacts at once, type [Unknown] into the Last Name field of the first contact in the list, then select the last name column. Click the Multi Fill Down button to fill in the same information for the other contacts with no last name in this spreadsheet.
Next, validate their address information. Select the Residence Street column, then click “Apartment Numbers” to separate apartment or suite numbers in a separate column.
Sumac also understands several countries' postal code formats, so you can validate these contacts' postal codes to make sure they're in the correct format. Select the postal code column, and under the Validate drop-down menu, choose "Postal Codes (Validate)."
If Sumac finds any errors in the postal codes, it highlights the row in which the error occurred.
You can fix these postal codes by manually editing them, or by selecting the postal code column again, and opening the Validate drop-down menu and choosing “Postal Codes (Repair).”
Sumac asks you to identify the column that contains the country, since it can do a better job of validating postal codes if it knows the country. If the country isn't a column in your spreadsheet, just click OK.
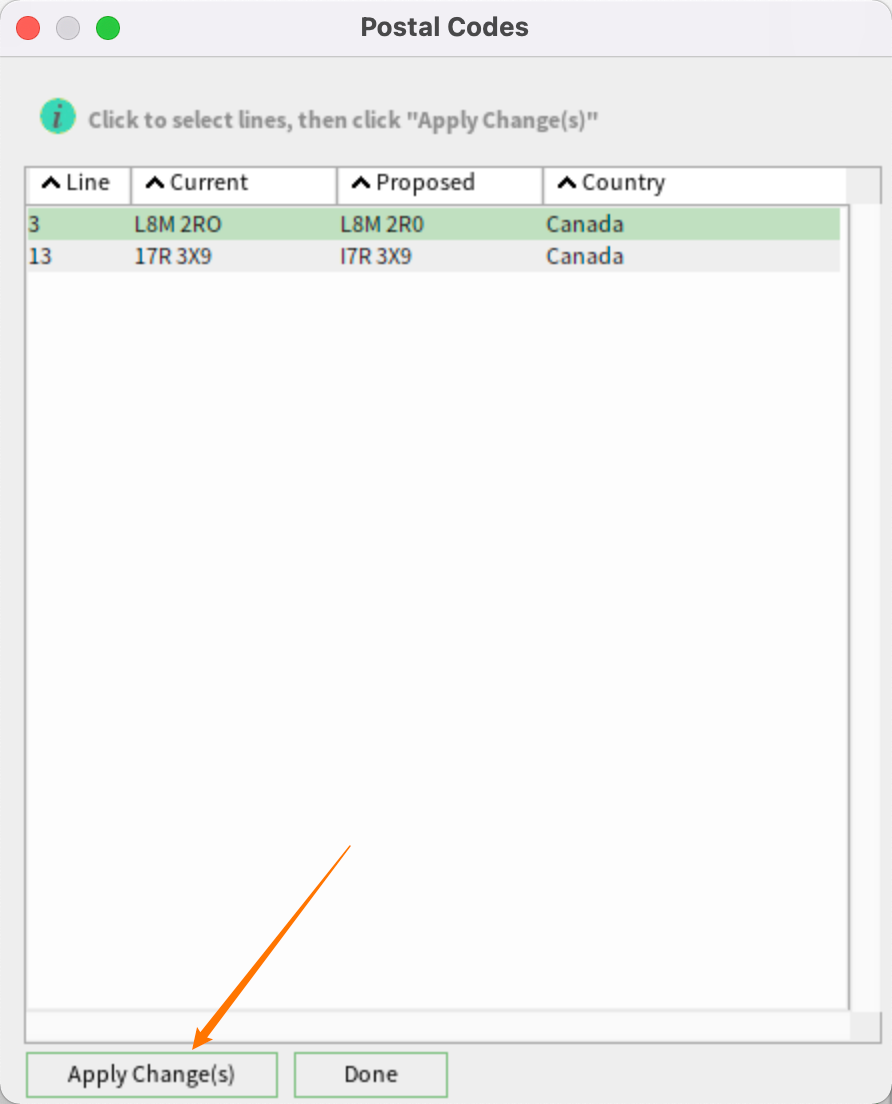
Sumac then proposes an appropriate solution to fix this postal code. Select the line and click Apply Changes to accept Sumac's solution. Then click "Done" to close the window.
To validate phone numbers, select the phone number column, then click Phone numbers.
Specify a default 3-digit area code that Sumac can use if it finds any numbers without area codes and click OK.
Sumac automatically validates all phone numbers and adds area codes to phone numbers that didn't have them. It also separates any extension numbers into a separate column.
To validate email addresses, select the email field and choose “Email (Correct Format)” from the Validate drop-down menu.
Sumac validates the email addresses. If it finds errors in any email address, Sumac highlights the bad rows so you can make corrections.
Click Show Only Selected to show only the selected, incorrect, rows.
Fix the invalid email addresses, then click Show All.
You can also validate email addresses to make sure that they are not already in your database. Select the email column and choose “Email (Not Duplicate)” from the Validate drop-down menu. Sumac selects any rows with duplicate email addresses.
Sumac can also validate dates. The last column in this spreadsheet is the contact birth date. Select the date column and open the validate drop-down menu. Select that you want to validate Dates.
Sumac can routinely handle most common date formats based on the settings on your computer. Confirm the format of the dates in the selected column and click OK.
Sumac validates the dates and re-formats them into the international standard year-month-day format.
Now that our spreadsheet has been cleaned, we need to save the work we've done before we can import this into the database.
To save the cleaned spreadsheet, make sure you use a file name that allows you to differentiate between your original spreadsheet and the one that has been cleaned up. Click "Save As" and Sumac automatically proposes a file name that is the same as the original, but with an increasing number on the end of the name. Then click Save.

If you plan to import data on a routine basis, consider using Universal Import! This helpful tool allows you to save your import preferences so that it is quick and easy to import donations any time. Check out this article to learn more about setting up Universal Import.
Our products got an upgrade!
Some screenshots and help videos have been made using older versions of our products. Though your version's colours and themes may appear different than what you see here, the instructions, links and advice in this article are still accurate and useful!
Related Articles
How to Import Contacts
Regardless of the type or source, you can import contacts into your Sumac database. In this example, we'll import new contacts. Before importing your spreadsheet, it is important to clean up the data. Use Sumac's Import Workspace to do this. Only ...How-to Video: Import Data – Donations (8:50)
Script: https://sumac.com/assetswp/training-docs/Import%20Donations.pdf If you plan on importing donations on a routine basis, consider using Universal Import! This helpful tool allows you to save your import preferences so that it is quick and easy ...Universal Import - How to resolve errors when running a Universal Import
When running a Universal Import, you may encounter errors if the data in your spreadsheet doesn’t match what is required in your database (e.g. if mandatory fields are missing data, or if dates in your spreadsheet are formatted incorrectly). If any ...Universal Import - How to create a new Universal Import Template
Sumac's Universal Import tool allows users to create their own Import Template to quickly import data from external applications. For example, If you use an external online donation collection tool (e.g. PayPal), you can download a report generated ...How to clean up and consolidate options in drop-down menus?
In order to be able to follow the steps below, your Sumac user login will need to have the permissions to delete Field Values and do Bulk Edits. If you are not seeing options mentioned below, it might be due to user permissions. For your admin, here ...
Societ Academy
Learn what you need to know, any time. Free!
- High quality training on demand - sessions are available every day, so you can access training that fits into your schedule.
- Training sessions that are easy to follow - helpful tips throughout each session, and access to training moderators ensure your questions get answered.
- A certificate of completion - you can request a certificate of completion for every session you attend.