Templated Import - How to create a new Import Template
Sumac's Templated Import tool allows users to create their own Import Template to quickly import data from third party tools and external applications.
For example, If you use an external online donation collection tool (e.g. PayPal), you can download a report generated from your external tool, and use this report to create your own Templated Import template to tell Sumac what type of records to create, which field in Sumac is associated with each column in the report, and define any Fixed Values or Default Values, as needed.
From your Sumac console, click Utilities > Data Management > Import Data. With "Templated Import" selected, click Manage Templates.
Click New to add a new Import Template. Give your Template a name, choose what kind of data will be imported from this file, then choose a sample of the file you'll be importing whenever this template is used. For example, if you'll be importing from PayPal, give this Import Template a name like "PayPal Import," indicate that this will import Contacts and Donations, and choose the report you typically download from PayPal as your file for setting up the Import Template.
Sumac opens a new window where you can set up your Import Template preferences.
Now you can start assigning Sumac fields to the columns in your spreadsheet. On the left hand side of this window, you will see the fields available, grouped by the area of Sumac. Click the arrow icon to expand the area of Sumac to see the fields available to import into that area.
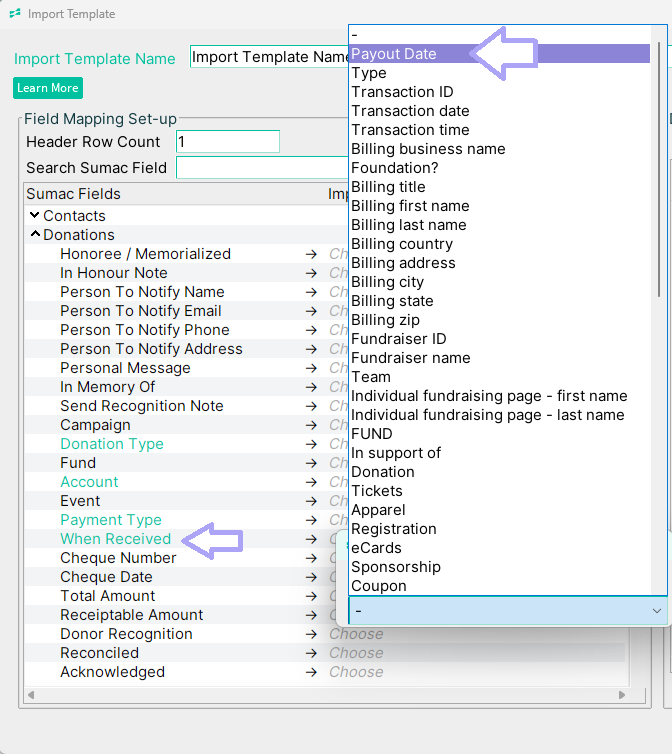
To map the fields in Sumac to one of the columns in your spreadsheet, simply click "Choose" next to that field name. Sumac will present you with the list of columns in your spreadsheet for you to choose which column should be associated with this field. For example, perhaps the "When Received" field in Sumac should be mapped to a column in your spreadsheet called "Payout Date."

As you assign fields to the columns in your spreadsheet, you'll see on the right side of this window, a snapshot of your spreadsheet and how each field is being mapped to each column.

You can assign the same field to multiple columns in the spreadsheet, as needed.

Important Note: When importing Contact data through Templated Import, Sumac uses contacts' email addresses to identify potential duplicate contacts in the incoming data. It is important that you assign a contact email address field to a column in your Import Template.

Use the "Default Value" option to assign a default value you want Sumac to apply whenever it sees a field in the incoming records is empty.
If your spreadsheet does not contain a column of data that Sumac requires to complete the import, you can set "Fixed Values" that you want Sumac to apply to all incoming records. For example, if you were setting up an Import Template for importing PayPal donations into Sumac, you might want to set "PayPal" as a Fixed Value for the Donation Type field for donations being imported. Here is what to do:
In the top right of the Import Template window, click "Switch to Advanced" in the top right:
This will adjust the Import Template display to show a new section for defining Fixed Values:
Drag and drop field titles from the Available fields to the Fixed Value section on the right. Then, click to choose a Fixed Value for that field.
Once you have assigned Sumac fields to each of the columns in your spreadsheet, and set up any Fixed Values required for importing, click "OK" to save your new Import Template. Once saved, you can continue to use this Import Template whenever you need to import data from that external tool!